Revised Betrayal Scene: The Final Piece
1. The Moment of Triumph (The Setup)
The scene begins as before. Aegis lies in ruins. The party is battered and low on resources. One of them finally holds the third Heart of Radiance shard, the prize at the heart of the Mournland. Let them have that brief, 30-second moment of victory.
2. The Arrival (The Twist)
The teleportation happens exactly as planned, triggered by Took’s ring.
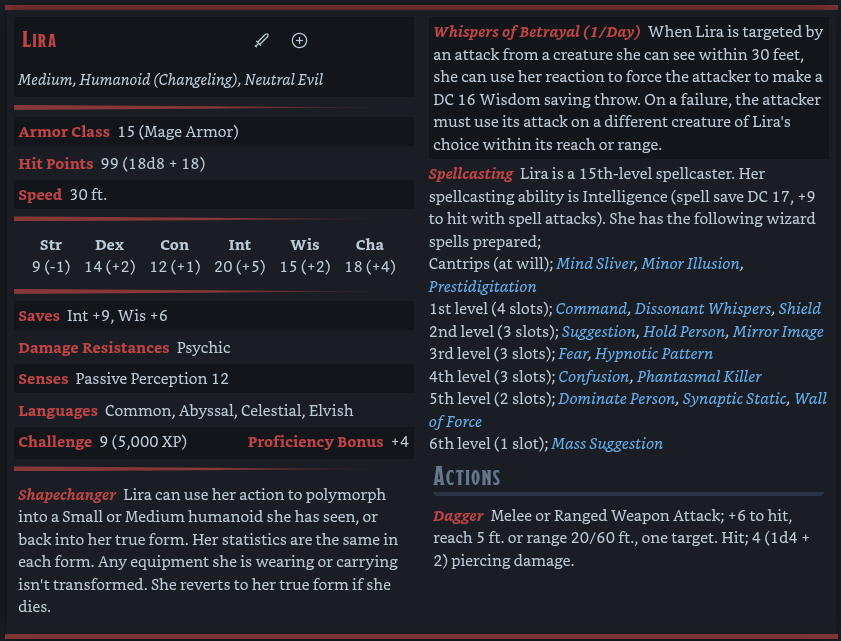
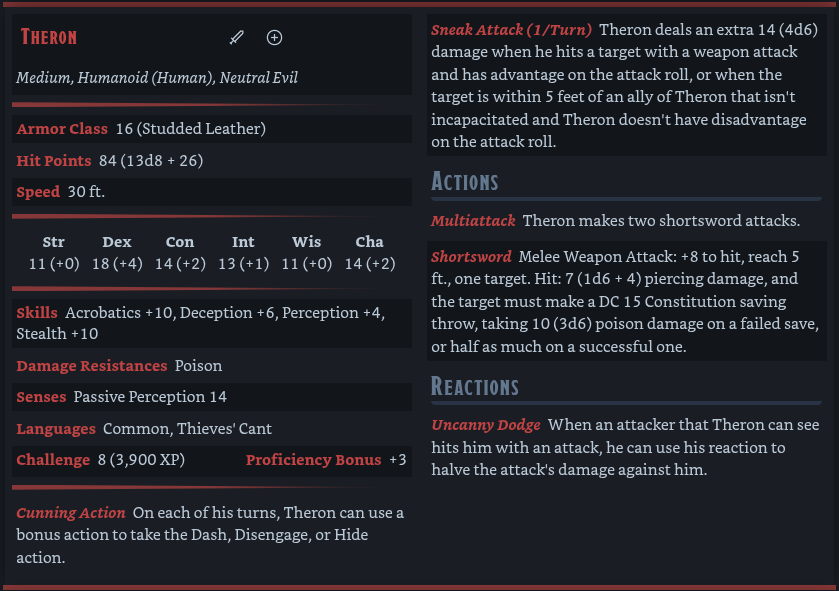
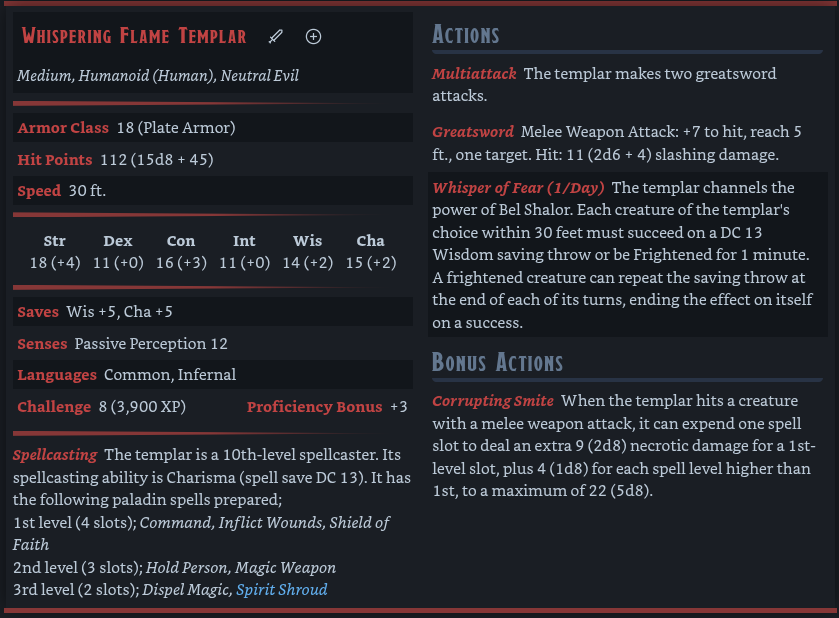
DM: “As you hold the final shard, a wave of pure energy washing over you, a different light flares in the chamber. Took, the ring on your finger burns with an intense, sickly golden light… In that same instant, a column of that tainted light erupts nearby. When it fades, Lira, Theron, and their hulking Dark Templar stand before you.”
3. The Confrontation (Revised Revelation)
Lira’s dialogue is now more pointed. She isn’t thanking them for gathering, she’s thanking them for retrieving the final, most difficult piece.
Lira: (A slow, genuine-looking smile spreads across her face) “There it is. The final piece. I knew you could do it. Truly, no one else could have survived this place and defeated its guardian. You have performed your service perfectly.”
Lira (glancing at Took’s ring): “And you made our arrival so wonderfully convenient.”
Lira (her smile turning cold): “Now, the Heart of Radiance can be made whole. Hand over the shard. Your part in this great work is, at long last, over.”
4. The Focused “Unwinnable” Fight
The party will resist. The villains’ tactics are now laser-focused on one objective: securing that single shard.
-
Roll Initiative!
-
The Villains’ Goal: Isolate the shard-bearer, retrieve the shard, and neutralize the remaining threats.
- Lira (Controller): Her first move is to identify who holds the shard. She will then use her most effective spell to neutralize that person or cut them off from their allies. A Wall of Force to isolate the shard-bearer and another key protector (like Toriman or Elrath) from the rest of the party is a perfect opening move.
- Dark Templar (Bruiser): The Templar immediately engages the most dangerous-looking party member not holding the shard, to tie them up and prevent them from interfering. Their goal is to deal massive damage quickly to show that resistance is futile.
- Theron (Thief): Theron’s job is to retrieve the item. He will use stealth and his Cunning Action to get into position. Once Lira has isolated or incapacitated the shard-bearer, Theron moves in to make the grab, possibly using a Sleight of Hand check or a Disarming Attack.
-
What if Took threw the shard into the antechamber? This plan still works perfectly. Lira uses Wall of Force to block the party in the main chamber while Theron uses his action to run into the antechamber and retrieve it. The Templar’s job is to keep the party from breaking Lira’s concentration.
5. The Escape & Aftermath (No Change)
Once Theron (or another agent) has the shard in hand, the endgame begins immediately.
- Lira’s Parting Shot: “You have done a great service for the true power within the Flame. Bel Shalor will remember you. Rest now.”
- The Escape & Trap: They vanish in a flash of golden light. Lira triggers the collapse as they leave, sealing the party inside the boss chamber.
Why this is still perfect:
This clarification makes the scene even tighter. The villains’ actions are more focused and desperate. The party’s failure is more poignant because they realize they were manipulated into retrieving the single most important and well-guarded piece of a doomsday weapon for the enemy. The outcome is the same, but the context is even more dramatic.
- The End of the Weekend: The session ends here. The party is wounded, exhausted, betrayed, has lost everything they worked for, and is now trapped deep beneath the Mournland. Their motivation for the next phase of the campaign is now crystal clear: Escape, Survive, and Get Revenge.
This sequence provides a dramatic and emotionally impactful climax for your D&D weekend, ensuring the players will be eagerly awaiting the start of the next arc.
Stat blocks